Friday, September 28, 2012

Vampy Chevron Nails

Today I'm showing you another tape manicure. I really love to do these just because it's so fun and simple and it's easy to come up with awesome looking results.

So today I decided to do chevrons. I have done these as accent nails here and there but today I wanted to try my hands at a full chevron manicure. And I wanted it to be vampy, so I chose black and red as my colours.


I started by painting the red on my fingers, which is NYC I ♥ NY. Which is a gorgeous red, by the way! I've worn this one pretty often, and so far it's my favourite red I have owned. I also used only one coat for this picture, which is pretty awesome.


After that tried I went ahead and applied the tape to all of my fingers and then add the black. I personally prefer to do it in this order, but you can also start with the black and then add the red later. The black is also by NYC, it's called City Blackout. Again, lovely polish. My favourite black so far.


I really, really like the outcome of these nails! But, sadly, they got ruined about 5 minutes after I was done... I spilled nail polish in my carpet. D'oh! I was so glad I managed to shoot a few pictures before that happened. I'm definitely going to be remaking this manicure, though!

Tuesday, September 25, 2012

Essie - Bikini So Teeny

Hey guys! This will be a pretty short and simple post. Even though we are entering the colder months, I still love bright colours, and I will not stop wearing them on my nails.

Which is why today I'm going to show you a polish that I'm pretty excited about, and it's Essie's Bikini So Teeny from this year's summer collection. I happened to find this one with a 50% discount when I was looking around a drugstore with my sister, and well... how could I resist?

I love the colour. It's a perfect cornflower-like light blue. But when I saw the bottle irl I liked it even more.


 Honestly, I saw a bunch of swatches of this polish but never saw those teeny tiny little flecks in it. And I don't blame the people that did those swatches, it is very subtle and I can imagine it being hard to capture on camera. But for some reason, my silly little camera did a great job at capturing it, as you can see in the above picture!

Isn't it pretty?


The application was perfect and I had no trouble at all painting this on my nails neatly. I barely needed to clean up around my nails. The polish was opaque in two coats. And the colour is gorgeous and I love the way it looks on me. No complaints about this polish at all, I can definitely add this to my list of favourites.


Extra bottle shot to show the shimmer. Actually, I'd rather describe this as very tiny silver coloured glass flecks. It's a great touch!

Sunday, September 23, 2012

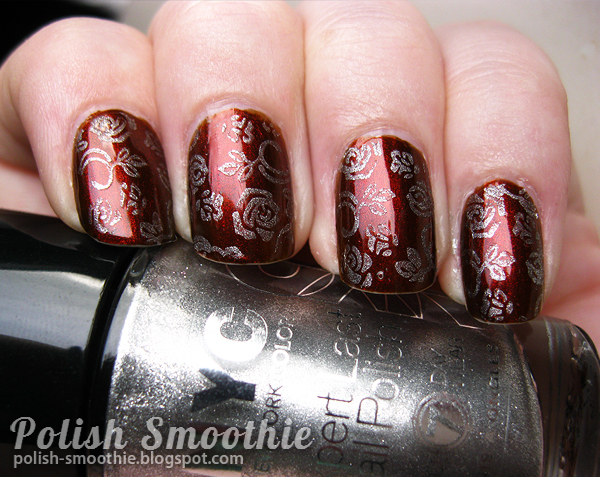
Herôme Take Away 'Chique Red'

Autumn has arrived! I like autum and winter, because it means I get to wear darker, vampy shades. Wearing those in the summer feels a bit odd to me! Today I am showing you a polish I recently bought that I think is going to be one of my autumn favourites.

When I was at my boyfriend's house, we went shopping in a mall and in one of the drug stores I found a box with Herôme's adorably tiny Take Away nail polishes. I took two with me, a beige holo and this pretty red.


It's a brownish shimmery red that flashes to an interesting greenish shade in the bottle, but it's not noticable on the nails. I love the colour so much! It's perfect for this time of the year, so I'll probably be wearing it more.

The polish does not seem to have a name anywhere on the bottle, but after a bit of research I found out Herôme is selling these minis on their website, and this one might simply be named 'Chique Red'. Don't take my word for it, though.


...and then after a day I felt like doing some more stamping. And I think I did a better job this time! I picked out a rose design and stamped it on using NYC Platinum Card (I really love this silver). I really like how it came out.

Sunday, September 16, 2012

Nail polish earrings

Hi guys! Today I want to show you some of the earrings I have been making recently. And yes - this is relevant to my blog because they were made with nail polish! I'm pretty sure that's not a new concept to most of you, but it's so much fun and there are so many endless combos you can make, I love it.


The first ones are made with one of my favourite polishes, Wet 'n Wild - Back Alley Deals. These earrings are super sparkly and pretty and I've worn them pretty often already. :)


Next up is a pair made with Essence - Blue Addicted. This polish is awesome and it's also amazing for earrings. The domed cabochons and the glitters give them a really cool looking depth!


These are fun too, and I made them with three different Golden Rose flakes. Unicorn Puke-esque, maybe? These are super sparkly as well.


I also decided to try stamping for the first time, and I ended up with these super cute zebra stripe earrings. I love love love these! I have a bunch more stamping plates on my way so once they get here I'm not only going to test them on my nails, but on my earrings as well. :D


Here is a pair that I made for a good friend of mine - who also follows this blog, hi Kyu! c: - I used the Spectraflair Topcoat for a gorgeous holographic effect over Stargazer 303. I will probably end up making a pair like this for myself at one point.

So what do you guys think, do you like my earrings? :D If you do, and you would like some for yourself, I am selling these! They cost between $8 and $12 and information about how to order them can be found on this page.

Friday, September 14, 2012

Stargazer 138... plus taping!

Hi guys! I'm at my  boyfriend's house right now, and I will be staying here for a few days. I have some posts planned ahead but I probably won't be able to comment anywhere. Just a heads up. :)

Stargazer is a very cool brand. So far I own three polishes by them and all of them are gorgeous and awesome additions to my collection. Today I'm going to show you one of these pretties plus some taping I added to it!


The nail polishes don't have names but this is 138, a very pretty green. I only picked up this polish because it was on sale for super cheap. I figured 'Why not?' and got it because I didn't have a colour like it yet. When I put it on my nails for the first time I loved it!

It is slightly duochrome, flashing to a greenish blue on certain lights, as you can clearly see in the bottle in the picture above. It's also crazy shiny and has a gorgeous depth to it. I keep looking at my nails!


Now the formula of this one isn't that great because it is a bit thick and gloopy, which made application a bit tricky. But for the price I got this for, I can definitely live with that.

After a few hours of wearing it, though, I got bored and tried out some more taping.


So I added black tips and a chevron tip as an accent nail! I really like how this looks, the black tips make it look very classy. :)

Do you own any Stargazer polishes? Which is your favourite?

Monday, September 10, 2012

Coral and silver french tips

 Hey guys.  Today I have something pretty simple for you. I was feeling a bit uninspired so I wanted to give myself some simple french tips which for some reason just wasn't working out. That's why I came up with some differently coloured and diagonal tips!


This is how it turned out. The coral is Essence - Off To Miami! I originally bought this colour just so I had a coral and orangey colour in case Iever needed one but I ended up really liking it. I let it dry for an hour and then I added the silver tips which is NYC - Platinum Card. 


So yeah, pretty simple but I think it came out pretty nice! I really need to practice with tape some more to get sharper lines. Good thing I have a ton of ideas for tape manicures. :)

Friday, September 07, 2012

H&M Duo - City and Zoo

Don't you love it when you end up really loving a nail polish you had your doubts about before? Today I will be showing you the duo City & Zoo by H&M. When I saw this in the store I bought it mostly because it was cheap and I have only ever tried out one other H&M polish before. Today I finally decided to wear them together to see what they'd look like.


This is City, the base colour of the two. It's a very pretty bright pink colour that looks good by itself. It's super glossy, the above picture is without a topcoat. It looks like a jelly but it really isn't. I used two coats, and there is still a bit of VNL but I figured the glitter would cover that up. Application was fine. The polish was pretty thin and runny but nothing too hard to control.

Then I applied the topcoat, Zoo, which looks like a dusty pink with holographic glitters in the bottle. This is why I had my doubts about it, because it just does not look appealing in the bottle to me. 


I ended up liking it a lot, though! I didn't expect that at all. The tiny glitter is super pretty and it sparkles like crazy. Me gusta.


I used one coat of Zoo to get the glitters on. It dried a bit gritty but a topcoat fixed that very easily and you end up with a super shiny and glittery manicure. :)

Also, I can finally show my thumbnail! Two months ago it broke and it ripped right into my nailbed. It hurt a lot and it looked terrible for weeks, so I'm glad it looks fine again!


A blurry closeup to show the sparkle. Look at that bottle. I'm sure you can understand why I keep staring at my nails...

I'm very happy with these polishes! I'm definitely going to try out Zoo over other polishes sometime and see what I end up with. :D Have you ever been pleasantly surprised by a polish?

Wednesday, September 05, 2012

Essie - Pink Diamond

Even though I only have three polishes by them so far, I love Essie. I love their colour range, their brushes, their bottles... the only thing holding me back from buying them is the price.

Anyhow, today I'm showing you my first Essie polish. I got this one two months ago as a birthday gift from my boyfriend. He got me Pink Diamond, because pink is my favourite colour and everyone knows it.


Pink Diamond is an adorable light pink colour with kind of a frosty finish, and I'm in love with it. I don't always like frosty nail polishes but this one looks good on me and the finish doesn't bother me very much. This is three thin coats of it. It applies like a dream.

This colour is perfect for when I feel like wearing something simple and subtle. :)


The only problem I have with this nail polish is the minor bubbling because no matter what I do, I always end up with some bubbles when I wear Pink Diamond. I'm not sure why this happens, maybe I have a bad bottle? At least they aren't very noticable. 

Tuesday, September 04, 2012

Catrice - Poison Me, Poison You + Stamping

Something really stupid happened two days ago.

I was craving chocolate milk so I opened up the fridge and grabbed the carton from the door. Then, I dropped it. And in an attempt to save the carton from falling on the floor I broke my middelfinger nail. Oops.

The difference in length looked too silly to me so I shortened all my nails to sad little nubs and gave myself a simple manicure, since it also ruined my previous one.


This is Catrice - Poison Me, Poison You, a gorgeous shimmery dark purple with warm undertones. Purple is pretty much my favourite colour for nail polish and this one is one of my favourites.

It's opaque in two coats and it dries pretty fast. I had no trouble applying it, the formula is great and ofcourse Catrice has a wonderful brush which made it very easy to apply.

I wore it by itself for one day but today I felt like it needed something extra. I did my first real attempt at stamping. Sure, I have used my stamp for creating my earrings, but I never had a succesful attempt on my nails yet. I recently bought a new silver, NYC Platinum Card and it was surprisingly good to stamp with!


I used one of the Essence stamping plates that I own and I think it turned out pretty cute. As you can see, the stamp didn't transfer that great everywhere, but I think that mostly is to blame on the plate itself.

However, I recently ordered a set of stamping plates from Born Pretty Store so hopefully those are of a better quality and you'll see more manicures with stamping soon! It's such a simple way to spice up a manicure and make it look awesome, so I'm looking forward to fiddling around with my new plates. :)

To end this post, have a gerbil.


Little Ben here tried to eat my camera!

Sunday, September 02, 2012

Pink French Tape Manicure

 A few days ago the rolls of striping tape I ordered finally got here! I already tried it out for my Dalek nail art but since I watched the season premiere yesterday I decided to do a full manicure with my striping tape.

... speaking of Doctor Who, if you have seen it, wasn't it amazing? I'm not going to spoil anything for those who still need to see it, but I loved it! :D

Anyway, the manicure I did was not an original idea of mine. I pretty much copied a manicure I found on Google, and I wanted to give proper credit to the person who did it but I forgot to save the link to their blog and I can't find it on Google anymore. So if the idea seems familiar, that's why.


This is my result. While striping tape is very helpful for making shapes and sharp lines I really love to add them to the nail as an accent. So for this manicure, I first used some regular scotch tape to create the diagonal french tips. After that had completely dried, I carefully added the silver striping tape. I really need to practice with putting the tape on properly because some bits of tape at the edges are letting loose as I'm typing this. Oops.


After I had added the tape I added some glitter to my tips. I'm still not sure if I like the glitter or not, though.

The polishes I used were Catrice - Hot Or Not? for the pink tips and Essence - Party Princess for the glitter. The striping tape I purchased from eBay. I have 10 different colours that I got for about 4 dollar from this seller. I'm pretty happy with it and ofcourse I'm already thinking of other manis to create with it. :)